0,Selenium是一个用于Web应用程序测试的工具。Selenium测试直接运行在浏览器中,就像真正的用户在操作一样。支持的浏览器包括IE(7, 8, 9, 10, 11),Mozilla Firefox,Safari,Google Chrome,Opera等。这个工具的主要功能包括:测试与浏览器的兼容性——测试你的应用程序看是否能够很好得工作在不同浏览器和操作系统之上。测试系统功能——创建回归测试检验软件功能和用户需求。支持自动录制动作和自动生成 .Net、Java、Perl等不同语言的测试脚本。
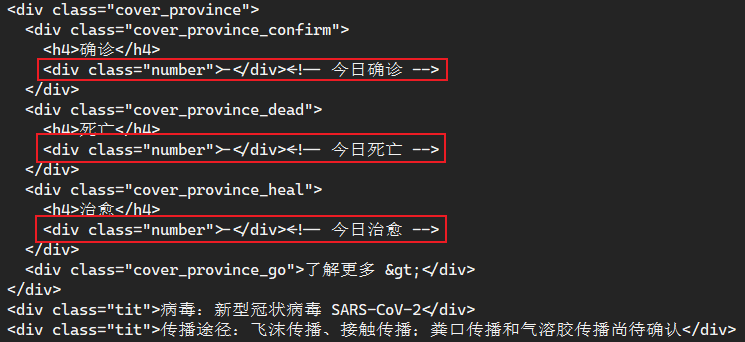
有些网页是打开之后才开始加载数据的,这时候我们使用requests等模块就无法正常爬取到数据
1,requests模拟爬取新冠病毒数据
1
2
3
4
5
6
7
8
9
| [root@k8s-node1 ~]
import requests
url = "https://news.163.com/special/epidemic/"
headers = {'user-agent': 'testing'}
res = requests.get(url, headers=headers)
print(res.text)
|

可以看到执行之后只能获取到标题,但是并没有我们想要的数据
2, 下面我们来使用selenium进行尝试
使用selenium前的准备
1
2
3
4
5
6
7
8
| //* 安装selenium模块
pip3 install selenium
//* 安装谷歌浏览器
wget https://dl.google.com/linux/direct/google-chrome-stable_current_x86_64.rpm --no-check-certificate
yum localinstall google-chrome-stable_current_x86_64.rpm -y
//* 安装chromedriver:一个用来和chrome交互的接口
yum install epel-release.noarch -y
yum install chromedriver -y
|
3, 测试使用selenium之后的结果
1
2
3
4
5
6
7
8
9
10
11
12
13
14
15
16
| [root@k8s-node1 ~]
from selenium import webdriver
from selenium.webdriver.chrome.options import Options
chrome_options = Options()
chrome_options.add_argument('--headless')
chrome_options.add_argument('--disable-gpu')
chrome_options.add_argument('--no-sandbox')
url = "https://news.163.com/special/epidemic/"
driver = webdriver.Chrome(chrome_options=chrome_options)
driver.get(url)
print(driver.page_source)
driver.close()
|

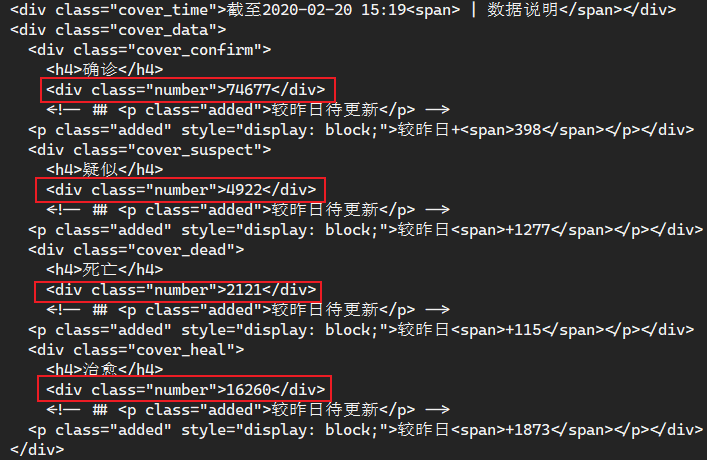
可以看到获取的网页源码里已经包含我们需要的数据了,只需要使用自己熟悉的方式提取出来即可
4, selenium有很多自己的方法,但是本人还是习惯使用bs4获取想要的数据
1
2
3
4
5
6
7
8
9
10
11
12
13
14
15
16
17
18
19
20
21
22
23
24
25
26
27
28
29
| [root@k8s-node1 ~]
import bs4
from selenium import webdriver
from selenium.webdriver.chrome.options import Options
chrome_options = Options()
chrome_options.add_argument('--headless')
chrome_options.add_argument('--disable-gpu')
chrome_options.add_argument('--no-sandbox')
driver = webdriver.Chrome(chrome_options=chrome_options)
driver.get('https://news.163.com/special/epidemic/')
bsres = bs4.BeautifulSoup(driver.page_source,'html.parser')
aaa = bsres.select('.cover_data')
for i in aaa:
item_confirm = i.find(class_='cover_confirm').text
item_suspect = i.find(class_='cover_suspect').text
item_dead = i.find(class_='cover_dead').text
item_heal = i.find(class_='cover_heal').text
print(item_confirm)
print()
print(item_suspect)
print()
print(item_dead)
print()
print(item_heal)
driver.close()
|

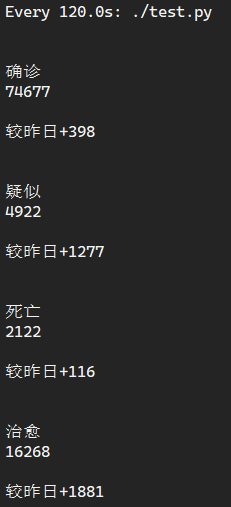
最后执行的结果就是这样了,虽然看起来很丑,但是已经获取到想要的数据了,想要分析的话只需要单独提取数据即可


